TLDR; this article covers Infrastructure as Code and exemplifies it using ARM Templates and Azure CLI. This covers all the main parts of an ARM templates so although a bit long article it gives you a good foundation to learn more.
We moved to the Cloud. That means we need to rethink things. We already iterate a lot over code and update it as requirement changes. The division between OPS and DEV has disappeared. This means when we iterate, we not only do so on code but deploys and infrastructure.
This means we need to know what we are deploying so we can deploy and redeploy often and accurately. We need to express our infrastructure as Code.
Application code and infrastructure, expressed as code, can be stored in a Code repository. That means any member of the team can deploy app code as well as infrastructure.
This is where ARM templates come in. ARM stands for Azure Resource Manager. The templates consist of JSON, JavaScript Object Notation.
There are many formats out there for expressing your infrastructure as code. ARM templates is one format out of many. So why ARM templates?
References
- ARM Overview Good overview page to learn more about ARM in general.
- Testing your template with arm-ttk Script that shows how you can test your template.
- What-if function A function allowing you to see what would happen if you were to try deploying this template.
- Policy as Code Policy as Code is a bog topic, learn more here.
- CI/CD for ARM templates Learn how to set up CI/CD or ARM templates.
- Azure Resource Manager (ARM) Tools Great extension tool that's a must have if you author ARM templates in VS code.

Why ARM
There are a ton of reasons but primarily it's a first class citizen on Azure. That means it will support deploying most things on Azure. It also means there will be great tools for authoring and deploying and a lot of other things. Let's have a closer look on the whys:
- Declarative syntax, this is about telling what you want rather than how. So your entire infrastructure can be specified.
- Repeatable results, there are couple of important things you get like idempotency - no matter how many times you deploy you get the same results.
- Orchestration, the deployments are handled for you. For example if you have many things you need to deploy and some things depend on some other things to exist, you don't have to worry - things will be created in the correct order. There are also some smart things going on with the deployment itself such as things being deployed in parallel to speed things up. In short, it's all managed, just declare what you need.
- Modularization, for some of you, what you have in the Cloud can be a really large complex things. To maintain it and structure it you might want to split up your deployment in many different files. With ARM you can do just that. ARM enables you have you deployment spread out over many small files and then have them linked together. It's also possible to list parts of your deployment inline, in a nested way.
- Extensibility, your templates can be further extended using Powershell or Bash. The script can live inside the template or it can be an external resource.
-
Tools, there are many tools that helps you while authoring your template/s. Here are some:
- Testing, by using a toolkit like arm-ttk* you can test your template and ensure it follows all the guidelines and best practices. arm-ttk is a Powershell script that you can download from here:
https://github.com/Azure/arm-ttk
- Preview changes, another important thing is to know the impact of your deployment before you actually carry it out. There's a what-if operation you can run that helps you with just that. It checks your template and tells you what will happen were you to deploy it. You can find out more about it here:
- Built-in validation, regardless of whether you use Powershell or Azure-CLI there is a validation process that runs when you tell the tool you want to deploy. If any validation errors are found it won't carry out the deployment so you don't end up in an erronous state.
- VS Code extensions, there is a VS Code extension that will help you with a lot of things concerning authoring. It provides snippets, auto completion, syntax highlighting and more - don't leave home without it ;)
Tracked deployments, In the Azure portal, you can review the deployment history and get information about the template deployment. You can see the template that was deployed, the parameter values passed in, and any output values. Other infrastructure as code services aren't tracked through the portal.

- Policy as code, Azure Policy is a policy as code framework to automate governance. If you're using Azure policies, policy remediation is done on non-compliant resources when deployed through templates.
https://docs.microsoft.com/en-us/azure/governance/policy/overview
- CI/CD integration, it's possible to set up your templates to work with CI/CD tools like Azure DevOps.
- Exportable code, even if you have deployed a resource already and not used an ARM template you can export it after the fact from the Azure portal.
Template file anatomy
The Template file represents what you want to do, what resources to create/update/delete.
Within your template, you can write template expressions that extend the capabilities of JSON. These expressions make use of the functions provided by Resource Manager. A Template has the following sections:
Parameters, Provide values during deployment that allow the same template to be used with different environments.
Variables, Define values that are reused in your templates. They can be constructed from parameter values.
User-defined functions, Create customized functions that simplify your template.
Resources, Specify the resources to deploy.
Outputs, Return values from the deployed resources.
Deployment process
When you deploy a template, Resource Manager converts the template into REST API operations.
template is converted to REST API calls.
For example, when Resource Manager receives a template with the following resource definition:
"resources": [
  {
    "type": "Microsoft.Storage/storageAccounts",
    "apiVersion": "2016-01-01",
    "name": "mystorageaccount",
    "location": "westus",
    "sku": {
      "name": "Standard_LRS"
    },
    "kind": "Storage",
    "properties": {}
  }
]
Becomes:
PUT
https://management.azure.com/subscriptions/{subscriptionId}/resourceGroups/{resourceGroupName}/providers/Microsoft.Storage/storageAccounts/mystorageaccount?api-version=2016-01-01
REQUEST BODY
{
  "location": "westus",
  "sku": {
    "name": "Standard_LRS"
  },
  "kind": "Storage",
  "properties": {}
}
Organizing your templates
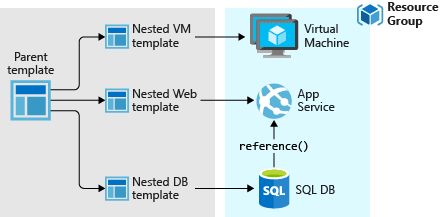
You could have one giant template that deploys everything. But you could also divide it up into many files that represents a specific part of your set up.
You would then have one master template and the other templates be linked in.
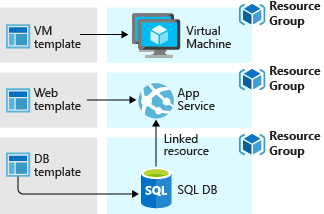
Or you can think of it in terms of lifecycles and depending on what it is, you would deploy it to different resource groups:
Your first deployment
This is what a very basic ARM template looks like:
{
  "$schema": "https://schema.management.azure.com/schemas/2019-04-01/deploymentTemplate.json#",
  "contentVersion": "1.0.0.0",
  "resources": []
}
It does not contain any resources. The resources array is empty. There are three properties of interest:
- $schema: Specifies the location of the JSON schema file. The schema file describes the properties that are available within a template. For example, the schema defines resources as one of the valid properties for a template. Don't worry that the date for the schema is 2019-04-01. This schema version is up-to-date and includes all of the latest features. The schema date hasn't been changed because there have been no breaking changes since its introduction.
- contentVersion: Specifies the version of the template (such as 1.0.0.0). You can provide any value for this element. Use this value to document significant changes in your template. When deploying resources using the template, this value can be used to make sure that the right template is being used.
- resources: Contains the resources you want to deploy or update. Currently, it's empty, but you'll add resources later.
DEMO - first deployment
- Create a file
azuredeploy.jsonand give it the following content:
   {
     "$schema": "https://schema.management.azure.com/schemas/2019-04-01/deploymentTemplate.json#",
     "contentVersion": "1.0.0.0",
     "resources": []
   }
- Sign in to azure through the terminal. Ensure you have Azure CLI installed and type:
az login
- Create a resource group, we need a resource group to deploy our template to. In the terminal type the following command:
   az group create \
   --name arm-demo1 \
   --location "Central US"
- It's time to deploy the template. We deploy it with the following command:
   templateFile="{provide-the-path-to-the-template-file}"
   resourceGroup="arm-demo1"
   az deployment group create \
   --name blanktemplate \
   --resource-group $resourceGroup \
   --template-file $templateFile
Inspect results, in the terminal you should be getting a JSON response. Look for an attribute called
provisioningState, it should have the valueSucceeded.Verify in portal, go to
portal.azure.com
- Select
Resource Groups - Select the
myResourceGroupresource. - Click
Overview - In the top right, click the
Deployments: 1 Succeeded, you should now see a list of deployments.
- Success !
Resources
All resources goes into the resources property in your ARM template, it's of type array.
DEMO - your first resource
Let's create a new resource.
- Open up
azuredeploy.json, locate theresourcesarray and add the following entry:
   {
    "type": "Microsoft.Storage/storageAccounts",
    "apiVersion": "2019-04-01",
    "name": "{provide-unique-name}",
    "location": "eastus",
    "sku": {
      "name": "Standard_LRS"
    },
    "kind": "StorageV2",
    "properties": {
      "supportsHttpsTrafficOnly": true
    }
   }
- Run the following command:
   az deployment group create \
   --name addstorage \
   --resource-group arm-demo1 \
   --template-file $templateFile
Parameters
You can use parameters in the template. The point with parameters is that you can take arguments from the outside as input arguments to your deploy script. These arguments can then be applied throughout the templates. You need to add the property parameters at root level.
DEMO - parameters
- Open up your ARM template and add a section like this at root level:
   "parameters": {
     "storageName": {
       "type": "string",
       "minLength": 3,
       "maxLength": 24
     }
   }
- Locate your
resourcesarray and it's first item looking like so:
   {
    "type": "Microsoft.Storage/storageAccounts",
    "apiVersion": "2019-04-01",
    "name": "{provide-unique-name}",
    "location": "eastus",
    "sku": {
      "name": "Standard_LRS"
    },
    "kind": "StorageV2",
    "properties": {
      "supportsHttpsTrafficOnly": true
    }
   }
and change its name property like so:
"name": "[parameters('storageName')]"
Above we are adding the parameter storageName. This means that when we now run our create deployment script we can add an argument to it looking like so:
- Deployment, the deployment can now set the
storageNamevalue by specifying it using the--parameters, like so:
--parameters storageName={your-unique-name}
A full deployment creation script would then look like so:
   az deployment group create \
     --name addnameparameter \
     --resource-group arm-demo1 \
     --template-file azure-parameter.json \
     --parameters storageName=chrisstorageuniquename
In the last row above we assign the value chrisstorageuniquename to our storageName parameter. This value will then be applied throughout the template.
Another example
-
Add a new parameter, add the following to the
parameterssection:
   "storageSKU": {
        "type": "string",
        "defaultValue": "Standard_LRS",
        "allowedValues": [
          "Standard_LRS",
          "Standard_GRS",
          "Standard_RAGRS",
          "Standard_ZRS",
          "Premium_LRS",
          "Premium_ZRS",
          "Standard_GZRS",
          "Standard_RAGZRS"
        ]
      }
Now we are using the property allowedValues to say what values are ok to set. We also get the flexibility to set SKUs differently in different environments. Note also how we set the property defaultValue. This means we don't have to set storageSKU if we don't want to, but we can override the default value by passing an input argument from the terminal.
Your ARM template should look like this:
   {
    "$schema": "https://schema.management.azure.com/schemas/2019-04-01/deploymentTemplate.json#",
    "contentVersion": "1.0.0.0",
    "parameters": {
      "storageName": {
        "type": "string",
        "minLength": 3,
        "maxLength": 24
      },
      "storageSKU": {
        "type": "string",
        "defaultValue": "Standard_LRS",
        "allowedValues": [
          "Standard_LRS",
          "Standard_GRS",
          "Standard_RAGRS",
          "Standard_ZRS",
          "Premium_LRS",
          "Premium_ZRS",
          "Standard_GZRS",
          "Standard_RAGZRS"
        ]
      }
    },
    "resources": [
      {
        "type": "Microsoft.Storage/storageAccounts",
        "apiVersion": "2019-04-01",
        "name": "[parameters('storageName')]",
        "location": "eastus",
        "sku": {
          "name": "[parameters('storageSKU')]"
        },
        "kind": "StorageV2",
        "properties": {
          "supportsHttpsTrafficOnly": true
        }
      }
     ]
    }
    ```
{% endraw %}


   and highlighting on SKU we see that we read from the input parameter like so:
{% raw %}


   ```json
   "sku": {
     "name": "[parameters('storageSKU')]"
   }
-
Deployment, because our new parameter
storageSKUhas thedefaultValueset, we don't actually need to specify it when we call the--parmametersvariable. So the below code looks the same as before:
   az deployment group create \
     --name addskuparameter \
     --resource-group myResourceGroup \
     --template-file $templateFile \
     --parameters storageName={your-unique-name}
Above if we look at --parameters we are only passing storageName, but
-
Explicitly pass
storageSKU, we could pass thestorageSKUas well. Then it would looks like this:
   az deployment group create \
     --name addskuparameter \
     --resource-group myResourceGroup \
     --template-file $templateFile \
     --parameters storageName={your-unique-name} storageSKU=Standard_GRS
Note above how we pass `Standard_GRS`, one of the values from the `allowedValues` list.
Template functions
So far we have been looking at using parameters and supplying the parameter values when calling our Azure CLI script with the --parameters keyword. This might not be enough. Imagine you have a case where you want all deployed resources end up on the same location by default, how would you solve that? You are probably thinking that you can create a parameter for the location and supply that to Azure CLI. That would work.
In this case, there is a better way. You can use a template function instead. There are built-in functions that you can invoke. One such function is resourceGroup(). Because you are deploying towards a specific resource group this function will return back an object representing that resource group. To get it's location you can call it like so resourceGroup().location.
DEMO - template functions
- Open up your ARM template .
- Locate your
parameterssection and add the following entry to it:
   "location": {
     "type": "string",
     "defaultValue": "[resourceGroup().location]"
   }
We can see above how the method is invoked and the result is assigned to the defaultValue property. Our full ARM template now looks like so:
```json
{
  "$schema": "https://schema.management.azure.com/schemas/2019-04-01/deploymentTemplate.json#",
  "contentVersion": "1.0.0.0",
  "parameters": {
    "storageName": {
      "type": "string",
      "minLength": 3,
      "maxLength": 24
    },
    "storageSKU": {
      "type": "string",
      "defaultValue": "Standard_LRS",
      "allowedValues": [
        "Standard_LRS",
        "Standard_GRS",
        "Standard_RAGRS",
        "Standard_ZRS",
        "Premium_LRS",
        "Premium_ZRS",
        "Standard_GZRS",
        "Standard_RAGZRS"
      ]
    },
    "location": {
      "type": "string",
      "defaultValue": "[resourceGroup().location]"
    }
  },
  "resources": [
    {
      "type": "Microsoft.Storage/storageAccounts",
      "apiVersion": "2019-04-01",
      "name": "[parameters('storageName')]",
      "location": "[parameters('location')]",
      "sku": {
        "name": "[parameters('storageSKU')]"
      },
      "kind": "StorageV2",
      "properties": {
        "supportsHttpsTrafficOnly": true
      }
    }
  ]
}
```
Variables
Variables simplify your templates by enabling you to write an expression once and reuse it throughout the template.
Example case - The parameter for the storage account name is hard-to-use because you have to provide a unique name. You're probably tired of guessing a unique name. To create a unique name we can use some built-in functions:
-
concat(), this function can concatenate two or more strings. -
uniqueString(), this function is capable of generating a unique hash.
Combining these two functions you can use them in the following way:
storagePrefix + unique hash = unique name for a storage account
As input value to uniqueString() you could for example use the id of the resource group you are deploying to. To get a hold of that resource group you can call the built-in function resourceGroup(), which returns a full object.
DEMO variables
- Open your ARM template add the following section on root level:
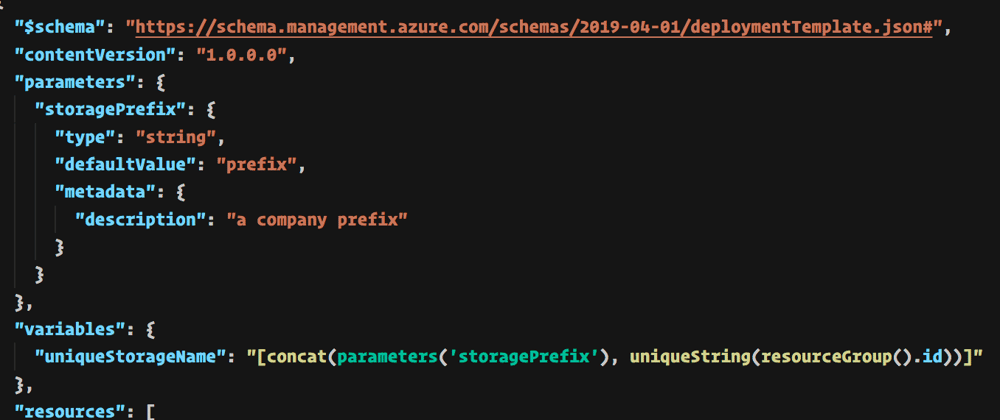
   "variables": {
     "uniqueStorageName": "[concat(parameters('storagePrefix'), uniqueString(resourceGroup().id))]"
   }
- To use it, locate the
resourcessection and it's first item. -
Change the
nameproperty of your resource item like so:
"name": "[variables('uniqueStorageName')]" -
Deployment, ensure you set the
storagePrefixso thatuniqueStorageNamehas all the dependent parameters set.
az deployment group create \
  --name addnamevariable \
  --resource-group myResourceGroup \
  --template-file $templateFile \
  --parameters storagePrefix=store storageSKU=Standard_LRS
Note above how the Azure CLI is setting the storagePrefix to store and how we internally in the template let variables and built-in template functions do the rest.
Output
You can return values from ARM templates. For example getting the endpoint for a new storage account might be useful. So how would we do that?
DEMO - output
-
Open up your ARM template and add an
outputssection on root level:
"outputs": {
    "storageEndpoint": {
      "type": "object",
      "value": "[reference(variables('uniqueStorageName')).primaryEndpoints]"
    }
  }
Above we can see we define a return value
storageEndpoint. We assign to the propertyvalueand we construct that value by callingreference(variables('uniqueStorageName')).primaryEndpoints. Whatreference()does is to look up a resource that we just created where name equals the value ofuniqueStorageName. -
Type the following in terminal to run the deployment command:
templateFile="<name of your ARM template file>"
  az deployment group create \
  --name output \
  --resource-group arm-demo1 \
  --template-file $templateFile \
  --parameters storagePrefix=demo
Summary
We've covered quite a few topics. The Infrastructure as Code area is a big one. Hopefully you have a grasp of the main idea. It's about ensuring your infrastructure can be expressed as code. You want it to be code so that it's easy to know what you've deployed but also so you can easily do so again and with precision. ARM templates are JSON files and have some great artifacts that help ensures your ARM templates are flexible so they can easily be applied on different environment for example. There's a lot more to know but do have a look at the references section to learn more.


Top comments (0)