This article is part of #ServerlessSeptember. You'll find other helpful articles, detailed tutorials, and videos in this all-things-Serverless content collection. New articles are published every day — that's right, every day — from community members and cloud advocates in the month of September.
Find out more about how Microsoft Azure enables your Serverless functions at https://docs.microsoft.com/azure/azure-functions/.
What makes Azure Durable Functions powerful is their ability to retain the state of an API even after the request is concluded. The advantage of having this is, you can go back to the API at a later time and track how the state has evolved. This explains what we mean by Stateful, while the term Serverless explains when a cloud provider manages the allocation of resources and the provision of a server architecture. An excellent use case of Azure Durable Functions is for building timers and notifications.
So what are Durable Functions? A Durable Function consists of different types of Azure Functions that can be used together to resolve orchestration challenges in a serverless architecture.
There are two words we need to get out of the way first before we can understand what Durable Functions offer — orchestration and durable.
Orchestration was initially used to describe an assembly of well-coordinated events and actions. It is heavily borrowed in computing to describe smooth coordination of computer systems. The keyword is coordinate. We need to put two or more units of a system together in a coordinated way.
Durable is used to describe anything that does well in withstanding the passing of time. The combination of system coordination and durability gets you Durable Functions. It is one of the best offerings of Azure’s Serverless Function. Durable Functions based on what we now know has these two features:
They can be used to assemble the execution of two or more functions and coordinate them, so race conditions do not occur (orchestration).
Durable Functions remember things. This is what makes it so powerful. It breaks the number one rule of HTTP: stateless. Durable functions keep their state intact no matter how long they have to wait. Create a schedule for 1,000,000 years into the future, and a durable function executes after one million years while remembering the parameters that were passed to it on the day of trigger. That means Durable Functions are stateful.
The fact that a serverless function can effectively maintain its state through time provides a sphere of opportunities. We will utilize one of those features for sending notifications in this article.
If you’re searching for a more visual representation of what Azure’s Durable Functions offer, I would recommend Sarah’s article on Durable Functions.
I also made a visual representation of the behaviour of the Durable Functions we will be writing today:
A typical Durable Function conforms to the following flow:
- A data modification from an external system that triggers the orchestration using the HTTP Trigger.
- The trigger then calls the orchestration function, which schedules an event.
- When the time for execution is due, a call to the orchestration function made again, but this time, it skips the orchestration and calls the activity function. The activity function is the action performer. This is where the magic happens, e.g. "send email notification". ## Create orchestrated Durable Functions
Let me walk you through creating functions using VS Code. You need two things:
Once you have both setup, we need them working together. You can do this using a VS Code extension and a Node CLI tool. Start with installing the CLI tool:
npm install -g azure-functions-core-tools

# OR

brew tap azure/functions
brew install azure-functions-core-tools
Once the installation is complete, pop open your VSCode editor and install the Azure Functions extension. If you’re feeling up to it, read more about setting up Azure Functions from my previous article.
Now that you have all the setup done, let’s get into creating these functions. The functions we will be creating will map to the following folders.
| Folder | Function |
|---|---|
schedule |
Durable HTTP Trigger |
scheduleOrchestrator |
Durable Orchestration |
sendEmail |
Durable Activity |
Create a folder named serverless, open the folder using the VSCode editor and follow the instructions below:
We’ll start by creating the trigger:
Click on the Azure extension icon and follow the image below to create the
schedulefunction

Since this is the first function, we chose the folder icon to create a function project. The icon after that creates a single function (not a project).
Select the
serverlessfolder.Select JavaScript as the language. You can select any other language of preference if you wish.
Select
Durable Functions HTTP starter. This is the trigger.Name the first function as
schedule
Next, create the orchestrator. Instead of creating a function project, create a function instead.
Click on the function icon:

Select
Durable Functions orchestrator.Name it
scheduleOrchestratorand hit Enter.Select a storage account when asked for one, Orchestrator uses the storage to maintain the state of a function-in-process.
Select a subscription in your Azure account. In my case, I chose the free trial subscription.
Follow the few remaining steps to create a storage account.
Finally, repeat the previous step to create an Activity. This time, the following should be different:
- Select
Durable Functions activity. - Name it
sendEmail. - No storage account will be needed.
Scheduling with a durable HTTP trigger
We will maintain the bootstrapped code in the serverless/schedule/index.js file. The contents of the file should look similar to the snippet below:
const df = require("durable-functions");
module.exports = async function (context, req) {
  const client = df.getClient(context);
  const instanceId = await client.startNew(req.params.functionName, undefined, req.body);
  context.log(`Started orchestration with ID = '${instanceId}'.`);
  return client.createCheckStatusResponse(context.bindingData.req, instanceId);
};
Let’s run through the contents of the file:
- We’re creating a durable function on the client side that is based on the context of the request.
- We’re calling the orchestrator using the client's
startNew()function. The orchestrator function name is passed as the first argument tostartNew()via theparamsobject. Areq.bodyis also passed tostartNew()as third argument which is forwarded to the orchestrator. - Finally, we return a set of data that can be used to check the status of the orchestrator function, or even cancel the process before it's complete.
The URL to call the above function would look like this:
http://localhost:7071/api/orchestrators/{functionName}
Where functionName is the name passed to startNew. In our case, it should be:
//localhost:7071/api/orchestrators/scheduleOrchestrator
It’s also good to know that you can change how this URL looks.
Orchestrating with a Durable Orchestrator
The HTTP trigger startNew call calls a function based on the name we pass to it. That name corresponds to the name of the function and folder that holds the orchestration logic. The serverless/scheduleOrchestrator/index.js file exports a Durable Function. Replace the content with the following:
const df = require("durable-functions");
module.exports = df.orchestrator(function* (context) {
  const input = context.df.getInput()
  // TODO -- 1

  // TODO -- 2
});
The orchestrator function retrieves the request body from the HTTP trigger using context.df.getInput().
Replace TODO -- 1 with the following line of code which might happen to be the most significant thing in this entire demo:
yield context.df.createTimer(new Date(input.startAt))
In this line, we create a timer based on the start date provided in the request body received from the HTTP trigger.
Upon getting to this line, execution bails temporarily after creating the timer. When the set timer runs down, it comes back, skips this line and executes the next line. Replace the TODO -- 2 comment with the following line of code:
return yield context.df.callActivity('sendEmail', input);
The function would call the activity function to send an email. We are also passing a payload as the second argument.
The body of the payload should look something like this:
{
  "description": "This is a test mail",
  "startAt": "2019-01-23",
  "title": "Test email",
  "email": "test@example.com"
}
This is what the completed function would look like:
const df = require("durable-functions");

module.exports = df.orchestrator(function* (context) {
  const input = context.df.getInput()

  yield context.df.createTimer(new Date(input.startAt))

  return yield context.df.callActivity('sendEmail', input);
});
Sending email with a durable activity
When a schedule is due, the orchestrator comes back to call the activity. The activity file lives in serverless/sendEmail/index.js. Replace what’s in there with the following:
const sgMail = require('@sendgrid/mail');
sgMail.setApiKey(process.env['SENDGRID_API_KEY']);

module.exports = async function(context) {
  // TODO -- 1
  const msg = {}
  // TODO -- 2
  return msg;
};
It currently imports SendGrid’s mailer and sets the API key. You can get an API Key by following these instructions.
I am setting the key in an environmental variable to keep my credentials safe. You can safely store yours the same way by creating a SENDGRID_API_KEY key in serverless/local.settings.json with your SendGrid key as the value:
{
  "IsEncrypted": false,
  "Values": {
    "AzureWebJobsStorage": "<<AzureWebJobsStorage>",
    "FUNCTIONS_WORKER_RUNTIME": "node",
    "SENDGRID_API_KEY": "<<SENDGRID_API_KEY>"
  }
}
Replace TODO -- 1 with the following line:
const { email, title, startAt, description } = context.bindings.payload;
This pulls out the event information from the input from the orchestrator function using object destructuring. You can name attached to the input context.bindings.payload can be anything so go to serverless/sendEmail/function.json and change the value of the name field to payload:
{
  "bindings": [
    {
      "name": "payload",
      "type": "activityTrigger",
      "direction": "in"
    }
  ]
}
Next, update TODO -- 2 with the following block to send an email:
const msg = {
    to: email,
    from: { email: 'chris@codebeast.dev', name: 'Codebeast Durable Functions' },
    subject: `Test: ${title}`,
    html: `<h4>${title} @ ${startAt}</h4> <p>${description}</p>`
  };
sgMail.send(msg);

return msg;
Here is the complete version:
const sgMail = require('@sendgrid/mail');
sgMail.setApiKey(process.env['SENDGRID_API_KEY']);

module.exports = async function(context) {
  const { email, title, startAt, description } = context.bindings.payload;
  const msg = {
    to: email,
    from: { email: 'chris@codebeast.dev', name: 'Codebeast Durable Functions' },
    subject: `Test: ${title}`,
    html: `<h4>${title} @ ${startAt}</h4> <p>${description}</p>`
  };
  sgMail.send(msg);

  return msg;
};
Deploying functions to Azure
Deploying functions to Azure is easy. It’s merely a click away from the VS Code editor. Click on the circled icon to deploy.

After deploying successfully, you should get a URL; store the URL safely as all requests to this function would be through this URL.
Testing
To test the function, we can make use of cURL or Postman to send HTTP requests to the trigger URL that was returned after deploying the function. First, we will test the function using cURL, run the command below in a terminal:
curl -d '{"description": "This is a test mail","startAt": "2019-01-23","title": "Test email","email": "test@example.com"}' -H "Content-Type: application/json" -X POST '<http://YOUR_HTTP_TRIGGER_URL>'
A sample response would look something like this:
{
    "id": "a14af5b16c6a4817af5484ac6c6dbeaf",
    "statusQueryGetUri": "",
    "sendEventPostUri": "",
    "terminatePostUri": "",
    "rewindPostUri": "",
    "purgeHistoryDeleteUri": ""
}
If you’re looking to test it using Postman, you can follow the annotated screenshot below:
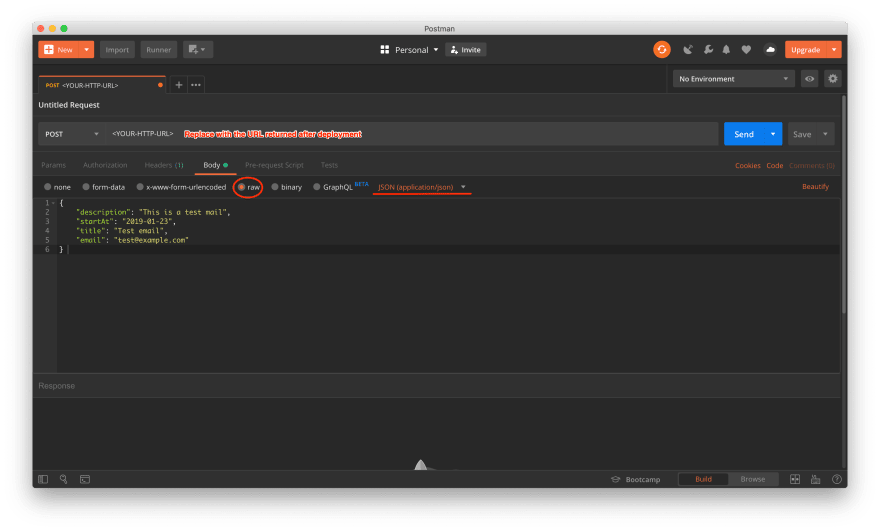
Enter the URL returned in the last section in the address bar. Click the body tab, select the raw option and pick JSON(application/json) from the dropdown on the right.
Fill in a JSON formattted request body and click Send to run the request. Endeavour to test with a functional email address.


Top comments (1)
I don't really see point of Azure Functions as consumption plan suffers huge lag in booting time, and it often misses schedule and 20% of executions are missed or leads to timeout. Having fixed plan is as good as writing ASP.NET service on IIS with Web Jobs. I see premium plan coming up, but I bet it is expensive and still simple web service is far better.
There is more overhead on bookkeeping for billing rather than actual benefit.
I suggest MS to look on network functions, which runs in isolation as it has no access to local server, boot time issue can be resolved, functions should only access and process HTTP resource. As function will not access any local resource, there is no need to spin up a VM, many functions in isolation can be in side an active VM.