
Follow me on Twitter, happy to take your suggestions on topics or improvements /Chris
This is the first part of a series of posts on using Docker and containerization with .Net Core.
In this article, we will
- Discuss containerization generally
-
Learn the steps we need to take like creating artifacts such as
Dockerfile,.dockerignoreand some basic Docker commands.
Resources
- Sign up for a free Azure account To use containers in the Cloud like a private registry you will need a free Azure account
- 5 part series on Docker, this series aims to provide you with a solid foundation in Docker and covers basic concepts, volumes, networks, docker compose and much more
- Dockerfile great practices for beginners This is a guide that will ensure your Docker Image will be as small as possible but also ensure it's performant and you understand why you should use certain commands.
Improve your Docker workflow with this VS Code extension
VS Code can really help you with your Docker workflow with this extension, build run, author, deploy, lot's of great commandsBuilding Microservices with .Net Core
This tutorial covers how to build a Microservice in .Net and Dockerize it.Getting started with ASP .Net Core
This will teach you web app development with ASP .Net Core using .Net Core CLIContainerize a .Net Core App
This shows how to Dockerize a Console App.Net Core and Docker
This is Docker themselves describing how to Dockerize a .Net App.
Why
In the title, we call what we are about to do dockerizing. It's called dockerizing after Docker. Another name for it is containerization, Docker is such a common vendor for containers the two concepts have become almost synonymous.
There are definitely other vendors. You can read more here if interested:
https://techbeacon.com/enterprise-it/30-essential-container-technology-tools-resources-0
Docker helps us to place our app in a container. So why do we want to do that in the first place? Well, there are many reasons for wanting to do this. First, let's talk about what a container is. Let's see how Docker defines it:
A container is a standard unit of software that packages up code and all its dependencies so the application runs quickly and reliably from one computing environment to another.
Ok, so we gain speed, reliability from one computer environment to another, so works on more than my machine?
Yes exactly that
What else?
A Docker container image is a lightweight, standalone, executable package of software that includes everything needed to run an application: code, runtime, system tools, system libraries, and settings
Ok, so I got everything with me, not only app code but also runtime, system tools, etc. Isn't that a Virtual Image?
Well no, it's a lightweight version. Containers use the underlying Host OS they run in to make syscalls.
Oh. I think I got it. I use Docker to create a container, this means I get something small and lightweight that looks the same on everyone's environment. I do this when I want to ship my app or?
Yes you got it and yes definitely when you want to ship your app but also during development if you want. Today the Cloud is super popular and becomes the default standard for hosting your app. Having your app in a container format means it's easy for us to scale it using, for example, Kubernetes when we want to manage a ton of containers or support a microservice architecture. Storing your containers in the Cloud, in a container registry, is also made possible at most of the large Cloud Vendors.
How - demo
ok, we brushed the surface on the WHY we should turn our app into a containerized version now let's look at the actual steps we need to take:
- Scaffold a .Net Web app,
- Create a Dockerfile
- Create a Docker ignore file
- Build our image
- Run our container
Scaffold a Web App
First off we need a .Net Web app. We can create that by using the dotnet CLI like so:
dotnet new webapp -o aspnetcoreapp
This will create a webapp that we name aspnetcoreapp.
Now that we have our web app, let's focus on the Docker part that we are currently missing and need to add.
Create a Dockerfile
Ok in this part we will create a file called Dockerfile. Its job is to specify what OS we need, what commands we want to be installed, where to find our app code and lastly how to start up our application within the container. Look at the Dockerfile like a recipe for what and how. Ok then. Let's create it:
touch Dockerfile
Specify image
For content, the first thing we need to define is an image we want to base it on. We also need to set a working directory where we want the files to end up on the container.
We do that with the command FROM and WORKDIR, like so:
# Dockerfile
FROM mcr.microsoft.com/dotnet/core/sdk:2.2 AS build-env

WORKDIR /app
What we are saying here is to go grab an image with a small OS image made for .Net Core. We also say that our working directory is /app.
Copy project file
Next, we need to copy the project file ending in .csproj. Additionally, we also need to call dotnet restore, to ensure we install all specified dependencies, like so:
COPY *.csproj ./
RUN dotnet restore
Copy and Build
Next, we need to copy our app files and build our app, like so:
COPY . ./
RUN dotnet publish -c Release -o out
Build runtime image
Here we again specify our image and our working directory, like so:
FROM mcr.microsoft.com/dotnet/core/aspnet:2.2
WORKDIR /app
There is a difference though, this time we want to copy our built files to app/out:
COPY --from=build-env /app/out .
Starting the app
Finally, we add a command for how to start up our app. We do that with the command ENTRYPOINT. ENTRYPOINT takes an array that transforms into a command-line invocation with arguments. Our command looks like so:
ENTRYPOINT ["dotnet", "aspnetcoreapp.dll"]
and simply means that it will invoke dotnet aspnetcoreapp.dll on the command line.
The Dockerfile in its entirety looks like this:
FROM mcr.microsoft.com/dotnet/core/sdk:2.2 AS build-env
WORKDIR /app

# Copy csproj and restore as distinct layers
COPY *.csproj ./
RUN dotnet restore

# Copy everything else and build
COPY . ./
RUN dotnet publish -c Release -o out

# Build runtime image
FROM mcr.microsoft.com/dotnet/core/aspnet:2.2
WORKDIR /app
COPY --from=build-env /app/out .
ENTRYPOINT ["dotnet", "aspnetcoreapp.dll"]
Create a .dockerignore file
Before we set out on our journey to build the instructions in the Dockerfile we need to address something, namely files/directories that we don't want. For this Docker tells us to create a file called .dockerignore. So what do we want in it? We want fast builds and to get that we need to ensure we don't directories like bin or obj in it.
First, create your .dockerignore file:
touch .dockerignore
Enter the following in our .dockerignore file
# .dockerignore

Dockerfile
[b|B]in
[O|o]bj
NOTE, # is used for comments.
Build our image & start container
At this point, we only have a recipe for what we want to do, namely our Dockerfile. From here we need to do things in two steps:
- Creating an image from our Dockerfile
- Create and run a container from our image.
Create our image
To create an image an image we can use the command docker build, like so:
docker build -t aspnetcoreapp .
If we break this down a bit we see that we use -t to give our image a name. aspnetcoreapp becomes the image name. Our last argument is a punctuation . and means where we can find the Dockerfile, which in our case is the current directory.
Running this command leads to first the .Net Core image being picked down, remember our FROM command:
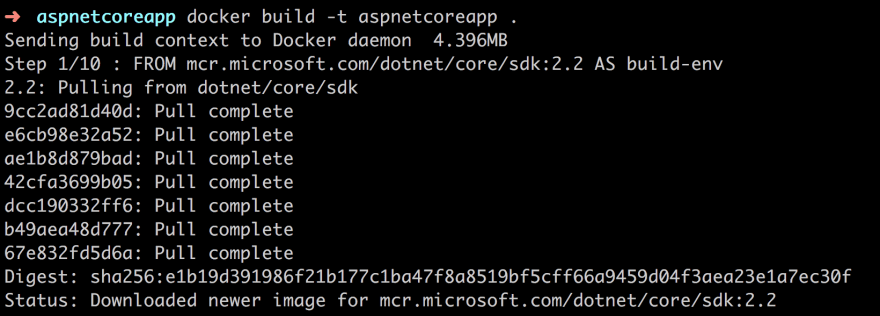
Thereafter it processes all the remaining commands in our Dockerfile:

Above we can see that it successfully tagged aspnetcoreapp:latest. This means everything is good and we have an image. So how can we check that?
Well, we can type the command docker images, like so:

Create and run our container
At this point, we have an image. That's great. It contains our app code, commands utilities, OS and everything else we told it to contain. We need to start it. To do that we need to turn it into a container. We do that we the command docker run, like so:
docker run -d -p 8080:80 --name myapp aspnetcoreapp
Let's break down the command:
-
-d, this simply means we run the container in the background. -
-pthat means we will match an external port to an internal container port. For someDockerfilespecification you need to explicitly expose an internal port, this is not needed in our case as it runs on port80. But let's be clear on the syntaxexternal port: internal port. This means we connect our machines port8080to the internal container port80. -
--name, this is us giving our container name,myapp. If we don't specify a name one will otherwise be generated for us. Having a name makes it easier to reference it later.
Our last argument is the image name aspnetcoreapp.
Let's check that our container was created and is running with the command docker ps:

Lastly, let's check that our container is up and running by going to http://localhost:8080:

Clean up
Right now we have created an image and container that is up and running. Over time you will have a ton of images and containers. This takes space so let's learn some Docker commands to keep this in check.
To stop your container type docker stop [docker name]. So in our case, that would be:
docker stop myapp
Removing the container is done with:
docker rm myapp
You can either stop/remove it using the name of the container or its id (at least the 3 first characters). You can find it's name by typing for example docker ps.
Right now we have two images left, aspnetcoreapp that we built and one called mcr.microsoft.com/dotnet/core/runtime:2.2 that we based our image on. To completely clean up we can use the command docker rmi, aka remove image, like so:
docker rmi myimage:latest
docker rmi mcr.microsoft.com/dotnet/core/runtime:2.2
Summary
We've taken our first steps with Docker in .Net Core. In doing so we discussed why containers and Docker.
We've also learned to specify the contents of a Dockerfile file to specify what we want to go into an image. Furthermore, we learned to create .dockerignore file to specify what should NOT go into our image to ensure we small and fast builds.
Additionally, we built and started our container.
In our next part, we will look into building a Microservice and deploying it to the Cloud.
Acknowledgements
You should be following Bruno, Java Champion, DevOps expert


Top comments (5)
Im trying to deploy my app, but i cant find the proprer way to run a initial migration to update a Postgres SQL database, the only option i have so far is copy the DotNet ef migrations script and run on the Postgres container 😒
Great article with useful resources ;) Thanks!
thanks Lukasz :)
Thank you . In addition to contianerizing a .net core web api as above, what if I wanted to contianerize a client application ( Vue ,react ...) that consumes this web api ? What if I wanted both to be in the same Image. Thanks for your help.
hi Shady. Thanks. Here's an article describing roughly that medium.com/@xiaolishen/develop-in-... . In other words I'd place my backend in on directory and my frontend in another directory and use Docker Compose to build it together.. Do you want me to write an article or are you able to get what you need from the above link?