
Follow me on Twitter, happy to take your suggestions on topics or improvements /Chris
Nuxt is a progressive framework based on Vue.js to create modern web applications. It is based on Vue.js official libraries (vue, vue-router and vuex) and powerful development tools (webpack, Babel and PostCSS). Nuxt goal is to make web development powerful and performant with a great developer experience in mind.
Based on Vue-router and Vuex, it also uses Webpack, Babel and PostCSS.
Goal, make web development powerful and performant.
Ok, so a sales pitch, what else?
The WHAT and WHY
Ok, so we love using Vue.js, it works great to use a router, a store, adding UI and so on, so why should we consider Nuxt?
The answer is SSR, Server side rendering
Why is that such a big deal? Well, search engines, they were made to crawl static pages and most SPA frameworks don't produce static pages but dynamic pages. This causes a problem if you want your app's SEO, to be any good, i.e end up high up on a Google search result. If you have a productivity app you might not care about that so much but if you have an e-commerce store you might be out of business if you haven't got this aspect covered.
Is that all Nuxt offer?
There is more. Nuxt makes it easy to bring in things such as code-splitting. Code splitting is an important aspect of the user experience. It allows us to only load as much of our app initially that's needed. It works like this, imagine the user visits your site. You only load a tiny portion of the app so the user perceives you got a fast-loading app - everyone's happy. As the user discovers more and more of your app they start navigating to other parts of it.
At this point, we load in the code needed for that new part the user is navigating to. This approach does a lot for the user experience, especially in places where the network connection is not that good. Having this for free in Nuxt is a big deal.
There is more to Nuxt of course, like hot module replacement, being able to load async data before SSR, a great approach to working with Sass, Less and so on.
Features
Here's a full list of all features Nuxt is offering:
- Write Vue Files (*.vue)
- Automatic Code Splitting
- Server-Side Rendering
- Powerful Routing System with Asynchronous Data
- Static File Serving
- ES2015+ Transpilation
- Bundling and minifying of your JS & CSS
-
Managing
<head>element (<title>,<meta>, etc.) - Hot module replacement in Development
- Pre-processor: Sass, Less, Stylus, etc.
- HTTP/2 push headers ready
- Extending with Modular architecture
That's quite the list right?
SSR and code splitting is what really sells it for me though. How about we try to learn it next?
Schema, lifecycle
Let's try to get ourselves a mile-high view of Nuxt. There are some steps from the incoming request to a rendered page.
In Nuxt we use a directive called <nuxt-link> to navigate between pages.
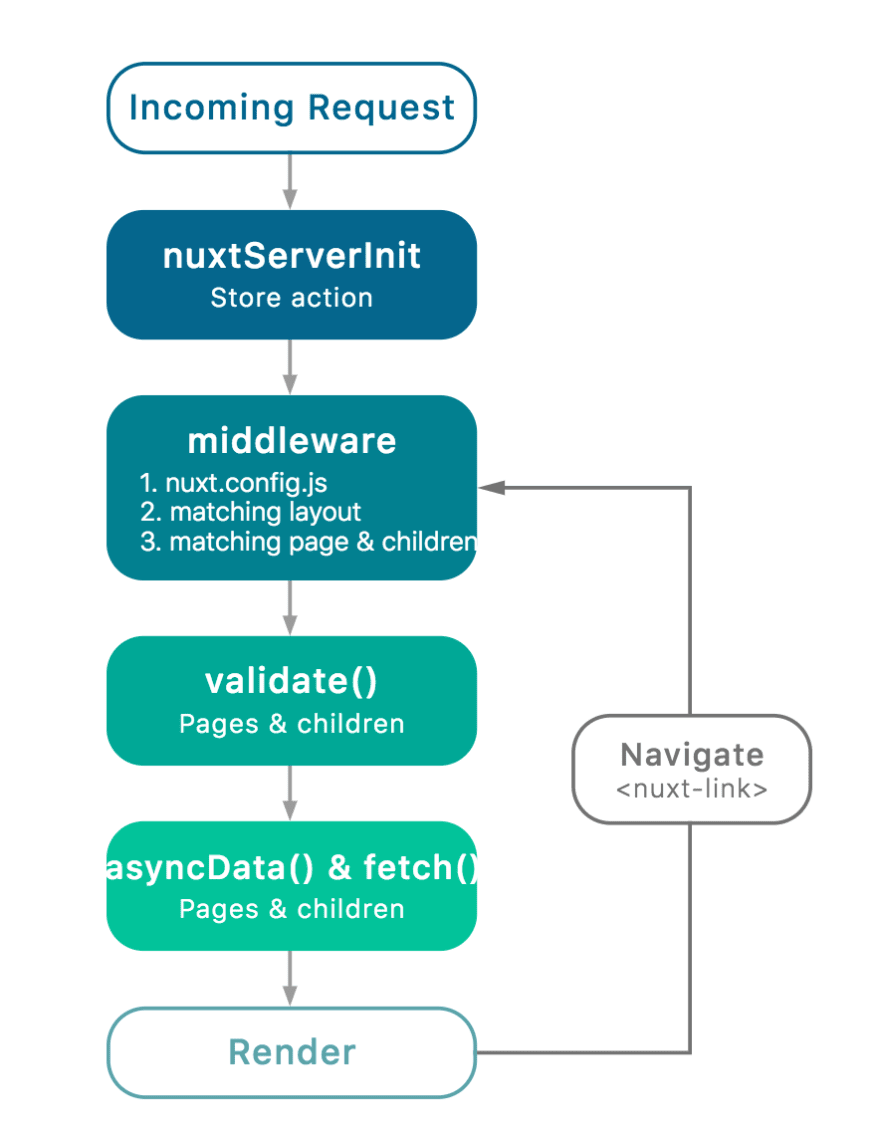
- nuxtServerInit, a store is part of your next app. This is an action we can define in the store if we want. It can be used to place data in the store the first thing we do, like a logged-in user. Read more here
- middleware, middleware are custom functions that can run before the rendering of a route. You could, for example, ensure that the user is properly authenticated before being able to see a specific route. Read more here
- validate, in this step, we validate that we are dealing with a valid request, for example, we could be validating that an incoming request has the correct route parameters
- asyncData() & fetch(), here we have the chance of fetching data asynchronously that will be part of the SSR rendering, for example, we could be fetching translations or some other data we need to render our page
- Render, here we render the page
SPA or SSR mode
If for any reason, you prefer not to use server-side rendering or need static hosting for your applications, you can simply use SPA mode using nuxt --spa.
In combination with the generate feature, it gives you a powerful SPA deployment mechanism without the need to use a Node.js runtime or any special server handling.
read more about available commands here:
SSR, Static site generation
The big innovation of Nuxt.js comes with the nuxt generate command.
When building your application, it will generate the HTML for every one of your routes and store it in a file.
How does that work?
-| pages/
----| about.vue
----| index.vue
turns into
-| dist/
----| about/
------| index.html
----| index.html
Great for crawlers :)
Hosting
Of course, you need to host your app somewhere. Currently, Netlify offers a great and easy way to do so with a simple command:
https://vueschool.io/lessons/how-to-deploy-nuxtjs-to-netlify?friend=nuxt
Creating an App
There are two ways to create apps in Nuxt:
-
Wizard, Using
create-nuxt-app, this will trigger a wizard where you are asked to add/opt in to different things -
Manually, A simple NPM install of
nuxtand you need to define most things yourself.
Create an app with create-nuxt-app
We can use the command create-nuxt-app to get a full-fledged project. The only thing we need to do is choose among different options.
Let's run the following command:
npx create-nuxt-app <project-name>
or yarn:
yarn create nuxt-app <project-name>
This triggers a dialog, first choose Server-side framework:
-1- server-side framework
This is what will help us to do things like server side rendering that we use for static site generation.
- None (Nuxt default server)
- Express
- Koa
- Hapi
- Feathers
- Micro
- Fastify
- Adonis (WIP)
-2- select UI library
Of course you want your app to look good. Below are all the most known UI libraries that will be included in your project.
Then select UI library:
- None (feel free to add one later)
- Bootstrap
- Vuetify
- Bulma
- Tailwind
- Element UI
- Ant Design Vue
- Buefy
- iView
- Tachyons
-3- choose Testing framework
Do you want testing? No? Well, you need it. Jest and AVA are both good options.
- None (feel free to add one later)
- Jest
- AVA
-4- select mode
This is where we select to have our app server side rendered or not. I'd go with Universal myself.
Select Universal or SPA mode
-5- http
fetch works of course but it's kind of nice when you can use a battle tested library like axios.
Add axios module for HTTP requests
-6- linting
You do lint right? We want our code to look consistent.
Add ESLint
-7- prettier
Add Prettier
-8- launch app
Launch app
cd <project-name>
npm run dev
the app should now be running on http://localhost:3000.
That was simple right? You opted into some tried and testing libraries that are sure to make your app better.
Below is your project overview, the result of running the creation tool.

Get started, from scratch
Let's have a look at the second approach, creating our app from scratch. First, we create a directory for our app to live in:
mkdir <project-name>
cd <project-name>
Update package.json
Next, let's add the necessary command to package.json so we can start up our app from the terminal:
{
  "name": "my-app",
  "scripts": {
    "dev": "nuxt"
  }
}
Now we can type npm run dev, to start the app.
Install nuxt
Next, let's install the nuxt library itself and save a reference to it in package.json:
npm install --save nuxt
Pages directory
Nuxt has some great conventions, so creating directories with certain names has meaning. That is the case with the directory pages. Everything, with file ending .vue, that is placed under the pages directory, will turn into a route.
<!-- index.vue -->
<template>
  <h1>Hello world!</h1>
</template>
Now run
npm run dev
This will start up our app. Let's go to the browser at http://localhost:3000 and have a look.

We have an app :)
Now try changing the template in index.vue, note how the change is reflected in the browser. This is because Nuxt comes with hot module reloading, it responds to changes.
Demo - SSR
Let's demonstrate the server-side rendering and how that works. As we mentioned before placing files under specific directories have meaning. We will continue to work with our pages directory.
This time, let's do the following:
-
Create a file
products.vueunder pages - Generate static site
Create a file
Let's create products.vue, under pages directory, with the following content:
<!-- products.vue -->
<template>
  <h1>Products</h1>
</template>
Our directory pages should now look like this:
-| pages/
---| index.vue
---| products.vue
Generate static site
Next up, let's generate those static files to make search engines everywhere happy.
We do this with the help of nuxt generate. Let's add that command to package.json and its scripts section like so:
"generate": "nuxt generate"
Next we run npm run generate, and we get a dist directory created, looking like so:
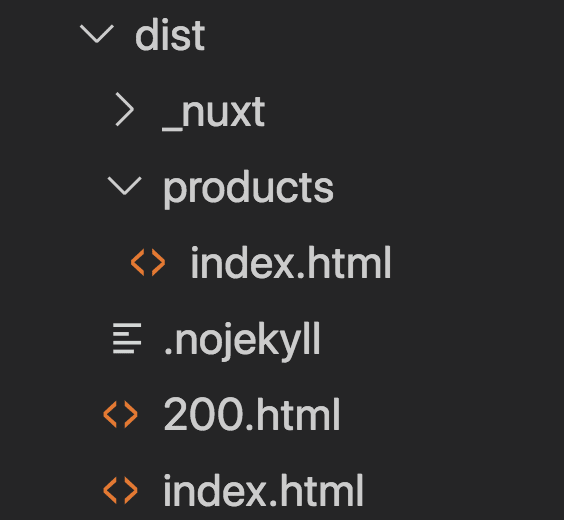
We can now easily host the content under dist using a tool, like for example http-server.
It looks like this in the browser:

As you can see http://localhost:5000/products/ and http://localhost:5000/products/index.html lead to the same place.
Working with Assets
Additionally to the pages directory, there's another directory that has special meaning. It's called assets. In there you can put images as well as stylesheets.
Working with image assets
Let's give it a try by doing the following
-
Creating
assetsdirectory and place a sample image file in there - Refer to sample image file in a Component
Create assets
We create our assets directory and place a file budapest.jpeg in there. Now your directory should look like the following:
-| assets/
---| budapest.jpeg
-| pages
--- | products.vue
Refer to asset
This time we want render our image asset. For this we will update products.vue to:
<!-- products.vue -->
<template>
  <div>
    <h1>Products</h1>
    <img src="~/assets/budapest.jpeg" alt="image" />
  </div>
</template>
What if we want to set this from code though? Then we extend the component to look like this:
<!-- products.vue -->
<template>
  <div>
    <h1>Products</h1>
    <img :src="img" alt="should work" />
  </div>
</template>
<script>
const url = require('~/assets/budapest.jpeg')

export default {
  data() {
    return {
      img: url
    }
  }
}
</script>
as you can see we need to import the resource to ensure we get the correct URL to our resource, like so:
const url = require('~/assets/budapest.jpeg')
Working with Style assets
You can use different approaches to styling in Nuxt like Sass, Scss, Less and CSS. For this example let's use scss.
To compile scss, we need some additional libraries. You need to run the following installation command in the terminal:
npm install node-sass sass-loader --save
This will give us the needed libraries so Nuxt can do the rest.
There are two ways we could be using scss now:
- Define styling in the component directly
-
Create an external file and place in the
assetsdirectory
Define scss in the component
Let's start with defining the styles in the component directly, like so:
<!-- sample.vue -->
<template>
  <div class="images">
    add some nice images here
  </div>
</template>
<style lang="scss">
  .images {
    margin: 15px;
    padding: 20px;
    display: flex;
    justify-content: center;
    box-shadow: 0 0 10px grey;
  }
</style>
Nuxt will compile the above and apply it to any matching CSS classes.
Define an external file
The other way we can work with styling assets is by creating separate files.
Let's create the file page.scss under assets/scss with the following content:
.page {
  .title {
    font-size: 20px;
  }
}
NOTE, we can create the styling file directly under assets directory but I just like to separate concerns so I recommend a directory approach like so:
-| assets/
---| images/
---| scss/
We also need to point this out to Webpack so it finds it, so go and create a file called nuxt.config.js in the root and give it the following content:
module.exports = {
  css: [
    '@/assets/scss/page.scss'
  ]
}
Now our directory structure for the whole project should look something like so:
-| assets/
---| scss/
---| images/
-| pages/
-| nuxt.config.js
-| package.json
NOTE, nuxt.config.js is a configuration file that Nuxt will read from if it exists. There are a lot more you can do with nuxt.config.js and we have reason to come back to it.
Working with routing
ok, we understand how we can create different pages by simply creating them in the pages directory. How to move between pages though?
Simple, use <nuxt-link>
We get a lot of routing set up for free. So given the following file structure:
pages/
--| user/
-----| index.vue
-----| one.vue
--| index.vue
we would get routing set up like so:
router: {
  routes: [
    {
      name: 'index',
      path: '/',
      component: 'pages/index.vue'
    },
    {
      name: 'user',
      path: '/user',
      component: 'pages/user/index.vue'
    },
    {
      name: 'user-one',
      path: '/user/one',
      component: 'pages/user/one.vue'
    }
  ]
}
Dynamic routing
We should understand by now how our file structure affects the routing. There are more aspects of routing we need to understand though namely dynamic routing.
Consider the following file structure:
pages/
--| _slug/
-----| comments.vue
-----| index.vue
--| users/
-----| _id.vue
--| index.vue
We see the usage of underscore, _ in both the directory _slug and the Vue file _id.vue. This is how we create routes with parameters.
Let's look at the resulting routes:
router: {
  routes: [
    {
      name: 'index',
      path: '/',
      component: 'pages/index.vue'
    },
    {
      name: 'users-id',
      path: '/users/:id?',
      component: 'pages/users/_id.vue'
    },
    {
      name: 'slug',
      path: '/:slug',
      component: 'pages/_slug/index.vue'
    },
    {
      name: 'slug-comments',
      path: '/:slug/comments',
      component: 'pages/_slug/comments.vue'
    }
  ]
}
our file structure:
--| users/
-----| _id.vue
resulted in a route looking like this /users/:id?.
NOTE, the ? means that's it's optional if you want to make it mandatory you need the file structure to look like this:
--| users/
-----| _id/
---------| index.vue
Also
--| _slug/
resulted in /:slug
Validate route params
Now that we know how to deal with parameters in the routes, how do we validate those parameters?
We can add a validate() method for that. If it fails the check it will automatically route you to the 404 page.
export default {
  validate ({ params }) {
    // Must be a number
    return /^\d+$/.test(params.id)
  }
}
Nested routes
Sometimes you might have routes within your routes. You might have a /products route that in itself might render different pages depending on how the full route looks.
Let's say if we go to /products, it should load a product list but if it goes to /products/1, it should load a product detail. If we have this scenario it means we will have the following behavior:
-
a shell, this page can contain static and dynamic data and will need to contain a
<nuxt-child/>component tag - a specific file structure
Let's have a look at the file structure:
pages/
--| products/
-----| _id.vue
-----| index.vue
--| products.vue
The above will treat products.vue as the shell page and it will generate the following routes:
router: {
  routes: [
    {
      path: '/products',
      component: 'pages/products.vue',
      children: [
        {
          path: '',
          component: 'pages/products/index.vue',
          name: 'products'
        },
        {
          path: ':id',
          component: 'pages/products/_id.vue',
          name: 'products-id'
        }
      ]
    }
  ]
}
To learn more about routing, check here:
Working with async
When a request comes to a specific route we can bring in data asynchronously and use that to render the page. For that, we can use asyncData and fetch our data. Below we have a Vue component where asyncData are asking for data. It will block rendering until the data is fetched. We end by returning the data. The data we return ends up being amended to the data property of the component. As w can see in our <template> we are referring to article that was part of the data we returned from asyncData.
<template>
  <div v-if="article">
    <h3>
    {{article.title}}
    </h3>
    <div>
      {{article.description}}
    </div>
  </div>
  <div v-else>
    <h3>Sorry</h3>
    No article with that name
    <strong>{{slug}}</strong>
  </div>
</template>
<script>
function getData(slug) {
  const content = {
    docker: {
      title: 'Docker 101',
      description: 'this is about Docker'
    },
    dotnet: {
      title: '.NET news',
      description: 'this is about .NET'
    }
  };
  return new Promise(resolve => {
    setTimeout(() => {
      resolve(content[slug]);
    }, 5000)
  })
}
export default {
  async asyncData ({ params }) {
    console.log('slug', params.slug);
    const res = await getData(params.slug)
    // called every time before loading the component
    return {
      article: res,
      slug: params.slug
    }
  }
}
</script>
Layout
For the layout we want to cover three cases:
- default page, this is the page that constitutes the default rendering of a page unless you explicitly override it.
- error page, we can specify a page that will take care of all erroneous responses.
- custom layout, we will cover how to define a custom layout component and show how to use our custom layout
First off, let's create the directory layouts, like so:
---| layouts
---| pages
Default page
To create a default layout, simply create a component default.vue, like so:
---| layouts
-------| default.vue
Next, give it the following content:
<template>
  <div>
    <div class="header">Hello route demo</div>
    <div class="subheader">
      <div class="item">
        <nuxt-link to="/">Home page</nuxt-link>
      </div>
      <div class="item">
        <nuxt-link to="/products">Products</nuxt-link>
      </div>
    </div>
    <nuxt/>
  </div>
</template>
<style scoped>
</style>
In our template we create a header section with CSS class subheader, in it we have a number of <div> elements, each with a <nuxt-link> element, that's our navigational link.
We also render the <nuxt/> element, now this is important. This is the element that renders our page content, if you forget this page then it won't work properly.
Error page
We can create an error page that will allow us to capture all errors. Let's create the component error.vue, like so:
---| layouts
-------| error.vue
Give it the following content:
<template>
  <div class="container">
    <h1 v-if="error.statusCode === 404">Page not found</h1>
    <h1 v-else>An error occurred</h1>
    <nuxt-link to="/">Home page</nuxt-link>
  </div>
</template>
<script>
export default {
  props: ['error']
  // ,layout: 'blog' // you can set a custom layout for the error page
}
</script>
Note, how we have a input property error, like so props: ['error']. Additionally notehoow we can filter on status code and can render different messages depending on what the error is:
<h1 v-if="error.statusCode === 404">Page not found</h1>
Custom layout
Lastly, let's show how to create and apply a custom layout. You can name your custom layout component anything you want. We elect to name our component blog.vue, like so:
---| layouts
-------| blog.vue
Next let's give it some content, like so:
<template>
  <div class="blog">
    <h1>Here's the template for an article</h1>
    <nuxt class="page" />
  </div>
</template>
This looks just like default.vue in that we have a <nuxt> element somewhere to make sure we render the page content.
How do we use it?
Good question. Let's take a page component and set the layout property, like so:
<template>
  <div>
    <h3>Docker 101</h3>
    <div>
      {{content}}
    </div>
  </div>
</template>
<script>
export default {
  layout: 'blog',
  data() {
    return {
      content: 'something...'
    }
  }
}
</script>
Note, how we point out the layout: 'blog', thereby we refer to our layout by its name, minus the file extension.
Summary
That was quite a lot in one article. Guess what though, there's a lot more to learn.
Let's recap on our learnings, we learned:
- The WHAT and WHY of Nuxt, it's important to understand the reason for wanting to use something. In the case of Nuxt, we learned that it had an opinionated architecture relying on convention. We also learned that it used a lot of great standard libraries for state management and server-side rendering.
- Static site generation, we learned how we can address the SEO problem that most SPA apps suffer from.
- How to create our Nuxt app in two ways, with a wizard and manually
- Assets, we learned how to deal with assets, images as well as styles
- Routing, then we covered routing, by convention based on our directory structures but also how to deal with dynamic routing
-
Async, then we learned how to use a method like
asyncData()to read asynchronous data before rendering a page. - Layout, we learned how to create different layouts like default, error and a custom layout.
That was a lot but hopefully, you are now so comfortable with Nuxt that you see its value and can find out the rest you need in the docs.


Top comments (5)
... I didn't see any reasoning in the article about why enterprises would choose Nuxt over some well-defined, traditional framework; what specific advantages Nuxt beings for B2B products; why enterprises should make the best out of the advantages Nuxt brings; and stuff like that.
Your title is misleading, to say the least.
hi. I was hoping it became clear through my reasoning in the article. Vue.js in itself is a great framework. Nuxt is on top of it.
There are a few things that makes Nuxt enterprise-grade to me:
As for using it versus some other framework that depends. There are many great choices out there for enterprise frameworks like React, Angular etc. It becomes very subjective which one is the best for your enterprise, depends on what your client wants, what developers you have at your company etc.
Chris, I think you need to correct this
active GitHub project, currently it has 50k users 42k stars, github.com/zeit/next.js/ so it's not a random library that might get abandoned tomorrow
to
active GitHub project, currently it has 24k stars, github.com/nuxt/nuxt.js so it's not a random library that might get abandoned tomorrow
Great write, loved it. I think if you had also discussed about a obvious feature "the auth module" when you say creating Enterprise app with nuxt/vue.
So I would love to see an article on usage of auth module used with nuxt and how to overcome problems it has, like refresh tokens and the expired token issue. Nuxt auth module makes it pain when your auth token is still there and expired.
hi Ayaz, I appreciate your comment. I'll make sure to talk about the auth module in a follow-up post