I have written before about how I using Microsoft Flow to automatically create GitHub Issues from tasks in Planner. This is working fine for the project I am working on, but we needed more for our web development team.
Our development team is growing and they are using Planner as there KanBan board. We wanted to create a Github issue when a task is moved from the backlog to the sprint backlog. So the trigger in Microsoft Flow is when a Planner task is moved. But that trigger doesn’t exist :(.
The problem
The connector and there triggers and actions in Microsoft Flow are create by Microsoft self. We can’t create our own triggers or actions. So sometimes we really mis a feature we need, just like this one. The only triggers available in Flow for Planner are:
- When a new task is created
- When a task is completed
- When a task is assigned to me
And what we really need is the trigger, when a task is moved. And it seems we are not the only one. You can post ideas or suggestion on the Microsoft PowerUser forum and this one is also listed there for more than a year.
Triggering a Flow when a task is moved
So we need a workaround for this. We need to find a way to check if a task is moved to another bucket and create a GitHub issue when it’s. After some testing, I came up with a solution that works quite well.
Instead of focusing on the task moved action I decided to run a Flow every 10 minutes. In the Flow, we will get all the task for a plan. For each task, we check if it’s in the correct bucket and if the progress is on 0%. If so we create an issue in GitHub and set the progress to 50%.
Creating the Microsoft Flow
Time needed: 15 minutes
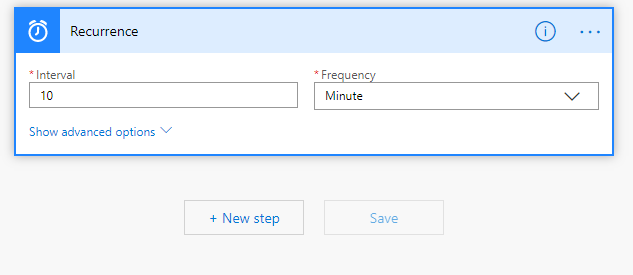
- Create the recurrence trigger
We start with the recurrence trigger. Set it to an interval of 10 minutes or whatever works for you.
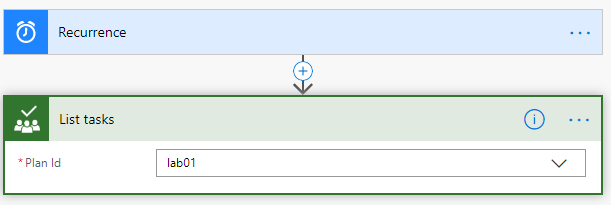
- List all task from the plan
Create a new step and select the List tasks action from Planner

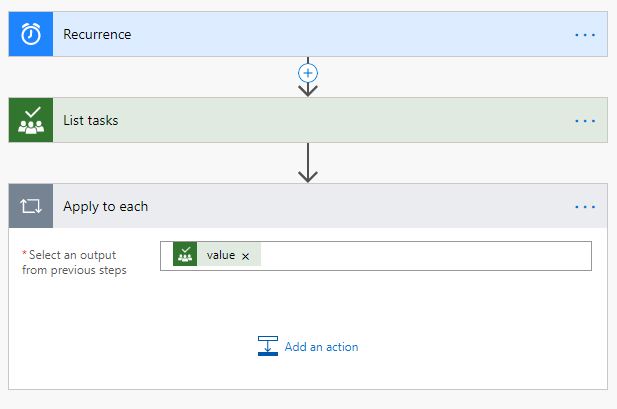
- For each loop
Next, we want to loop through all the task in the list. Add a new step and select the built-in action apply to each.
Select the output Value from the previous step.
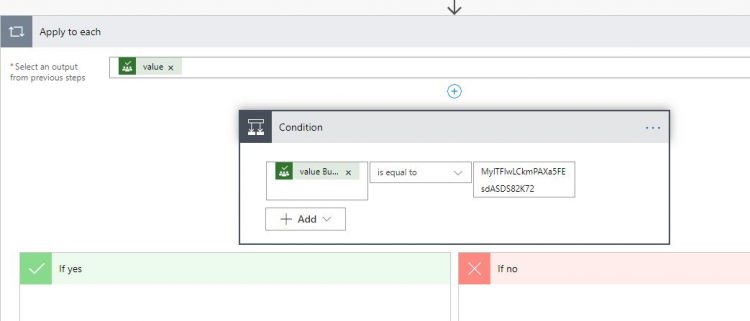
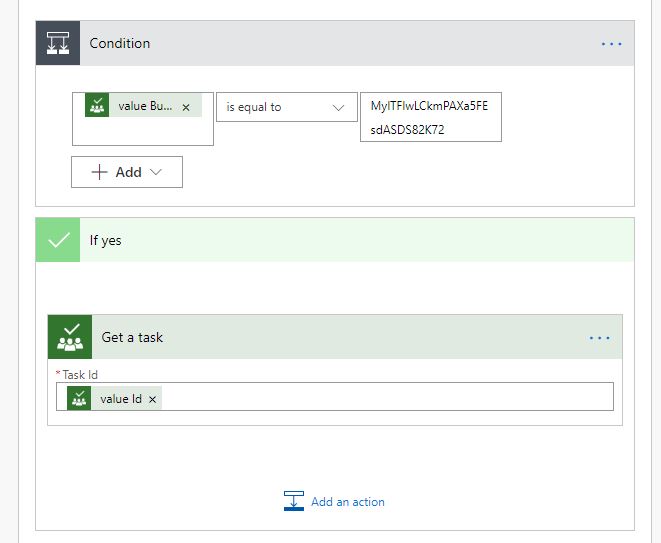
- Check the bucket
Add an action in the apply to each. Select the condition action from the built-in actions. We are going to check the value Bucket Id and it has to be equal to the bucket Id that we found in Planner or Graph.

- Get the task
If the task is in the correct bucket we are going to get the task. Not the task details, because that will only return the description. Add an action in the If Yes part and select the Planner action get a task.
Link the task Id by using the Value Id field
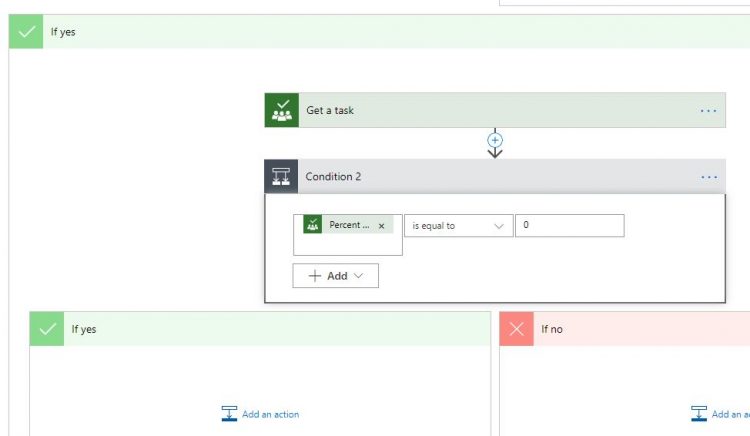
- Checking the percentage
Now we need another condition, we are going to check the task progress. Add a condition below the Get a task action. Check the Percentage Complete value, it has to be equal to 0.

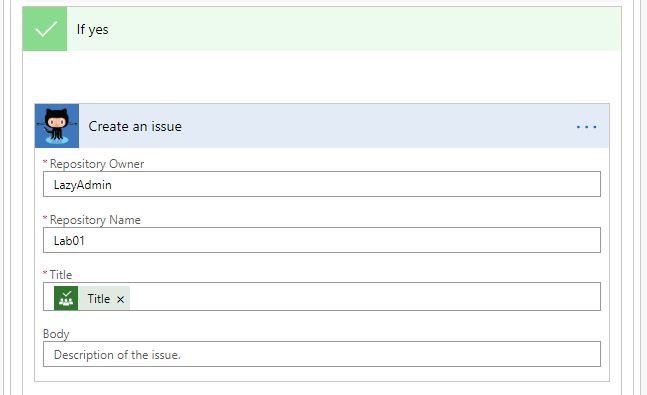
- Create the GitHub issue
If the percentage is 0 we have a new task for this bucket. So we are going to create a GitHub issue from it. In the If Yes part we add the action create Issue.
I leave the details out of this article, check this article if you want to know more about it. If you need the task description (and you probably do), you can add the Planner action, get task details
first.
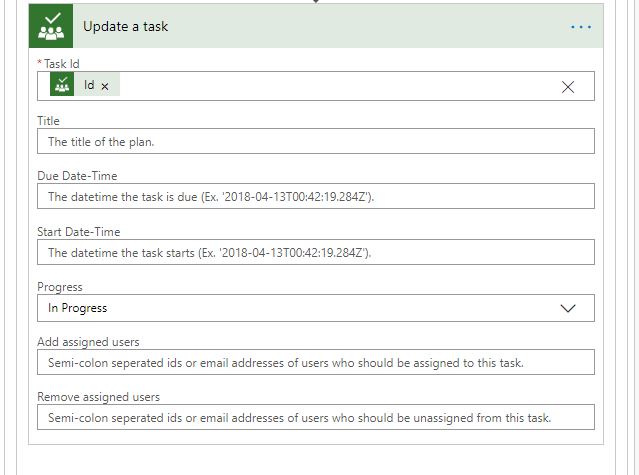
- Final important step
The last action in If Yes is to set the percentage to 50. This way we know that this task is processed when the flow runs again.
Add the Planner action Update a task. Set the task id (just scroll down to Enter Custom value) and the progress value to In Progress
Final thoughts
Microsoft Flow is a great tool to automate things. Also, the platform is still growing and new connections, triggers and actions are added regularly we still miss some basic actions or triggers in it.
Sometimes by thinking a bit out of the box, we can still automate our tasks, we just need to take a look at it from another angle.


Great work. It’s just ridiculous the hoops Microsoft makes you go through to do something so basic.
Great thank you. Just some advice, there are some important steps that need to be added if one has never used Power Automate before. For example:
2. List all task from the plan – should maybe be “Choose Operation > Search For Planner”
3. List tasks action from Planner
From someone who has never used Power Automate before 🙂
May I suggest instead of using conditional logic within your Apply to Each loop, you first filter the results of List Tasks using the Filter Array step and then Apply to Each the results. Your logic will run faster, more efficiently and within Microsoft best practice.
(You can even write multiple filter conditions using the Power Automate Expression language
https://docs.microsoft.com/en-us/azure/logic-apps/workflow-definition-language-functions-reference)
Is it possible to do this without checking the percentage. What I mean is, can I send a notification if the bucket id of a task changes? I’ve been trying to do this with a condition on the “Apply to each” if it is equal to the first bucket id then checking to see if that id changes, but nothing seems to happen when I move the item and run a test in Flow.
Great post Rudy, thanks for sharing this content!
I use planner to create a KanBan board to my team for a DevOps approach for application releases, as I have multiple buckets, the percentage wasn’t enough, so I took the idea and expanded a bit using a excel spreadsheet and I wanted to share the knowledge.
I created a spreadsheet with two tables: One for all my buckets (Columns: Bucket ID and Bucket name [Name = Buckets]) and one for my tasks (Columns: Task ID and current Bucket ID [Name = Tasks])
For every x minutes > List tasks in Planner > List rows from Tasks table > If value Task ID in Planner is equal to Task ID in Tasks table and value Bucket ID is not equal to Bucket ID in Tasks table > Update the Tasks table with the new Bucket ID > List rows from Buckets table > If Bucket ID in Buckets table us equal to value Bucket ID from Planner > Post a message to Teams/ Send an email with the new Bucket name.
This is helping me a lot and I hope it can help more people facing the same problem!
Hi Dio,
Thanks for sharing your solution!
Hey, can you post a print of yout Flow ? It will help me a LOT !
Or Send a link with a print
If this works for me I’m going to send you a bottle of Whiskey.
I need to use it to update back to a SP list when the bucket changes. Let me know if you think that should work.
Yes this will work with a SharePoint list to. You only need to accept that you have to set the task progress level to a percentage.
50% gives you also a visual confirmation in planner. I am not sure if you can work with a lower percentage.
Let me know if it worked 😉