
This guide will take you through the steps you need to take in order to migrate from Exchange Server 2013 to version 2016.
To read other parts in this series, go to:
Exchange 2013 to Exchange 2016 Migration (Part 2)
Exchange 2013 to Exchange 2016 Migration (Part 3)
Exchange 2013 to Exchange 2016 Migration (Part 4)
Exchange 2013 to Exchange 2016 Migration (Part 5)
Exchange 2013 to Exchange 2016 Migration (Part 6)
Exchange 2013 to Exchange 2016 Migration (Part 7)
Instant Solution - Exchange Migrator
Exchange/Office 365 migrations are quite easy with professional tools like Exchange Migrator. This tool helps to manage mailbox and public folder migrations involving different Exchange versions and deployment types. Also, this tool helps with all tasks starting from the pre-migration analysis to the preparation of reports after the migration.
Note: If you are upgrading from Exchange 2010, please see our Exchange 2010 to 2016 migration series.
Advantages of Exchange Server 2016 over Exchange Server 2013
Exchange Server 2016 has brought the latest features and services to strengthen the email communication system of businesses. It offers improved security and data availability features and provides better integration to the cloud. Though a new version (Exchange 2019) is available, Exchange 2016 is all equipped to meet the enterprise-level emailing requirements of even very large organizations. Also, it is more affordable than Exchange 2019. For Exchange 2010 users, it is the latest Exchange version to which they can directly upgrade (Exchange 2010 users cannot directly migrate to Exchange 2019). So, if you are an Exchange 2010 user, you can consider 2016 as your best option. You can easily upgrade to Exchange Server 2016 to scale up the efficiency of professional email communication.
In Exchange 2016, Microsoft has retained only two server roles – Mailbox Server Role and Edge Transport Server Role:
- Mailbox Server Role
- Edge Transport Server Role
-
Mailbox Server Role
-
Edge Transport Server Role
Mailbox Server Role combines the two important server roles of Exchange 2013 – Mailbox Server role and Client Access Server role. The Mailbox Server role contains the backend client access protocol, all the mailbox databases, transport services, and Unified Messaging services.
Edge Transport Servers are deployed in the perimeter network and handle the external mail flow. This Server Role makes the Exchange environment safer by providing additional layers of message protection. It tackles all the viruses, spam, and faulty email flow.
We, for simplicity, consider a single 2013 Exchange Server. We will first install Exchange Server 2016 and then migrate data from Exchange 2013 to 2016.
1. Preparing the environment
Before starting the migration, you need to prepare the environment and ensure that it meets all the essential system requirements. Then read the release notes to make sure you won’t have any post-migration issues. Ascertain the important parameters of the Exchange server appropriately so that there is sufficient RAM, CPU and storage space available for the server to perform smoothly.
The next step is to find out whether your clients are supported by the Exchange Server 2016. If they are not on the list of supported clients, upgrade them. Install a supported OS; this can be Windows Server 2012 Standard/Datacenter or Windows Server 2012 R2 Standard/Datacenter. In our case, we used Windows Server 2012. After installation, join the server to the domain. After the environment has been prepared, the next task is to install Exchange Server 2016.
2. Installing Prerequisites and Exchange Server 2016
Before proceeding to Exchange Server 2016 installation, ensure that the user in charge has the appropriate permissions to do it. Before starting, ensure that the following prerequisites have been installed:
2.1 Pre-requisites
- Install .Net 4.5.2
- Install the Windows Management Framework 4.0
- Install the Unified Messaging Communications Managed API 4.0 Runtime
- Install the required Windows features. Run the following PowerShell command to install the required Windows features.
Install-WindowsFeature AS-HTTP-Activation, Desktop-Experience, NET-Framework-45-Features, RPC-over-HTTP-proxy, RSAT-Clustering, RSAT-Clustering-CmdInterface, RSAT-Clustering-Mgmt, RSAT-Clustering-PowerShell, Web-Mgmt-Console, WAS-Process-Model, Web-Asp-Net45, Web-Basic-Auth, Web-Client-Auth, Web-Digest-Auth, Web-Dir-Browsing, Web-Dyn-Compression, Web-Http-Errors, Web-Http-Logging, Web-Http-Redirect, Web-Http-Tracing, Web-ISAPI-Ext, Web-ISAPI-Filter, Web-Lgcy-Mgmt-Console, Web-Metabase, Web-Mgmt-Console, Web-Mgmt-Service, Web-Net-Ext45, Web-Request-Monitor, Web-Server, Web-Stat-Compression, Web-Static-Content, Web-Windows-Auth, Web-WMI, Windows-Identity-Foundation,RSAT-ADDS
2.2 Installing the Exchange Server 2016
After the environment is ready and the prerequisites have been installed, we can install Exchange Server 2016. Follow the below steps:
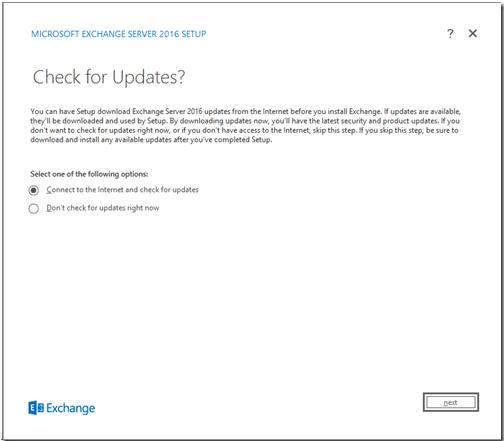
- Download and extract the Exchange Server 2016 setup file. After the file has been extracted, run the Exchange Setup (Setup.exe) to begin installing the Exchange Server, select the first option and click Next.
- The Setup will look for updates, and if found, will install it. Click Next to proceed. The Setup will copy the required files and initialize the installation. The Introduction page will appear; click Next to proceed.
- In the next step, the License Agreement page opens up, accept the license. Click Next to proceed.
- Then, select Recommended Settings and click Next to proceed.
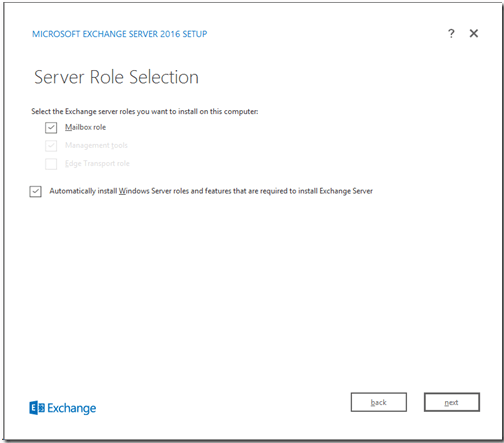
- On clicking next, select the server role page will appear. Select the ‘Mailbox Role’ and click Next to proceed.
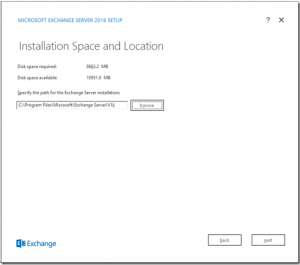
- Specify the location where the software will be installed. It can be installed at the default location, or a different location can be specified using the browse button.
- In the next step, you will have to select whether you want the Malware Protection Settings. By default, the settings are enabled, but you can choose to disable them.
- The Setup will do a readiness check of the system and will configure prerequisites. The installation will continue, and finally, a window will popup reporting a successful installation.
3. Setup the Service Connection Point
The Service Connection Point (SCP) is an Exchange Server object’s attribute in Active Directory, which guides domain-joined Outlook clients to a URL to get auto-discover settings. This attribute is, by default, the FQDN of the server. The SCP should be configured to refer to the Exchange Server 2013 endpoint.
Conclusion
This is the first blog in a series that will give you in-depth details of all the steps involved in migrating from Exchange Server 2013 to Exchange Server 2016. In this part, we made sure our environment met the prerequisites for Exchange Server 2016, prepared the environment for installation, installed the Exchange Server 2016, and configured the SCP. The next blog (part 2) will discuss installing the correct SSL certificate on Exchange 2016.
FAQs
Q. From where can I download the .Net Framework?
A. You can download the latest version of .Net Framework from the official Microsoft website. Here is the URL – https://dotnet.microsoft.com/download/dotnet-framework/net48
You can download it and continue with the migration.
Q. Is Exchange Admin Center available in Exchange Server 2016?
A. Yes, Exchange Admin Center was launched in Exchange Server 2013, and you can access it in the web browser for the latest Exchange 2016 version.
Q. Why Mailbox Role is important in Exchange?
A. In Exchange Server Mailbox Role performs many tasks for mailbox management.
- It has transport services to route mails.
- It has mailbox databases to store data.
- It accepts client connections with all the protocols.
Q. Why Edge Transport Role is important in Exchange?
A. The Edge Transport Role is helpful for communication between mailboxes.
- It regulates the external mail flow for all the mailboxes in Exchange.
- It provides the anti-spam and mail flow rules for each mail coming inside or going outside the organization.
Q. When can I start the migration using Exchange Migrator?
A. When you have installed all the prerequisites mentioned in the article, you can start migration using the software.
