Clearing the SharePoint Configuration Cache
Once in a while you may have a need to clear the outdated configuration cache in SharePoint 2010/2013/2016. For example, sometimes the timer job tends to get stuck and clearing the cache helps in that situation. You can either clear the SharePoint configuration cache manually or use a PowerShell script. I will document both methods in this article. In my examples, I am working with SharePoint Server 2016 but the same method works in the previous versions of SharePoint.
Clearing the Configuration Cache Manually
Use the following steps to clear the configuration cache manually.
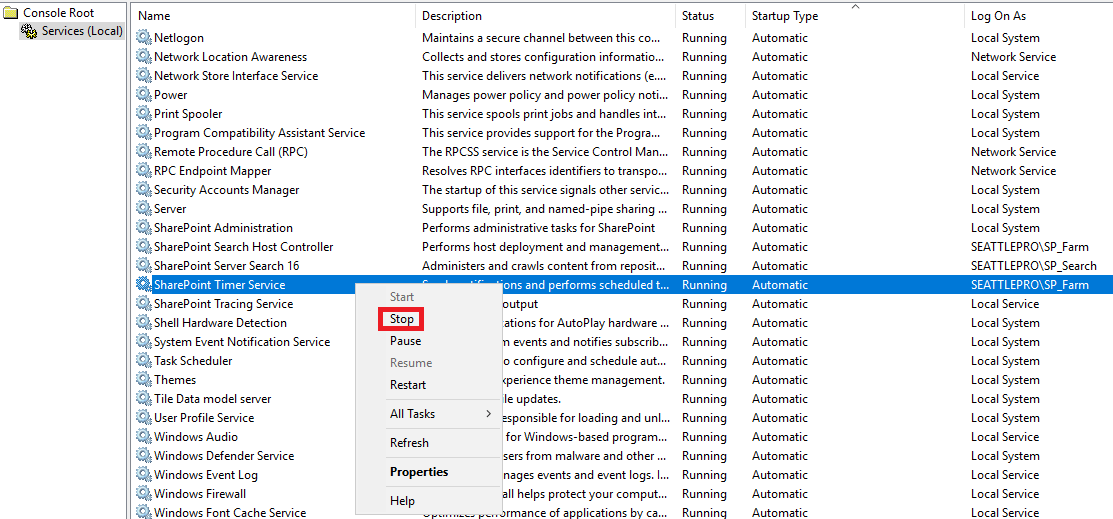
- Stop the SharePoint Timer Service.
- Go to %SystemDrive%\ProgramData\Microsoft\SharePoint\Config folder in File Explorer. The Program Data folder is hidden by default so you may have to unhide it in the File Explorer. As a best practice, I recommend displaying hidden files on all Windows servers.
- There are a couple of folders with the GUID in the Config folder. You want the one that has hyphens in the name.
- Inside this folder you will find lots of files. Your goal is to delete all the files, except the cache.ini. First make a backup of the cache.ini file. You can either copy and paste it in the same folder. The cache – Copy.ini will become your backup file.
- Now that you have a backup of the cache.ini file, you need to delete all the .xml files. The easiest way to find the cache.ini file among thousands of files is to sort the Type column by clicking on the column header.
- Click Ctrl-A to highlight all the files in the folder and then Ctrl-click cache.ini so it is deselected.
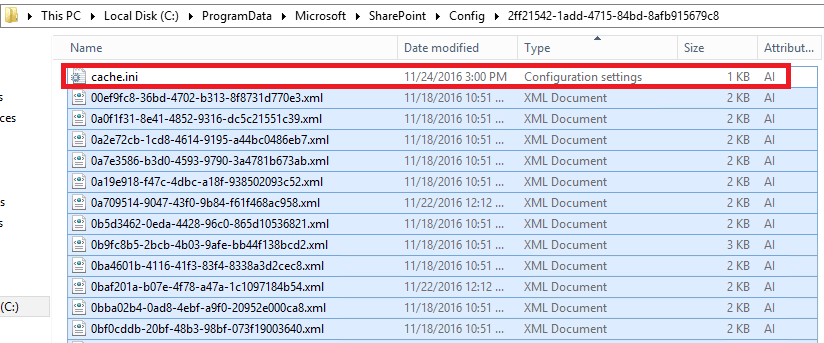
- Delete all the files. This will leave you with only the cache.ini file in this folder. DO NOT delete the folder. Your goal is to rebuild the cache in the same folder that was created by the system.
- Open the cache.ini file. You are probably expecting tons of information in the file but all it has is a 5 or 6-digit number, e.g. 356867. Replace this number with 1 so the only data in the file is the number 1. Now save the file. Changing this number to 1 resets the cache and it will be rebuild after the SharePoint Timer Service is restarted.
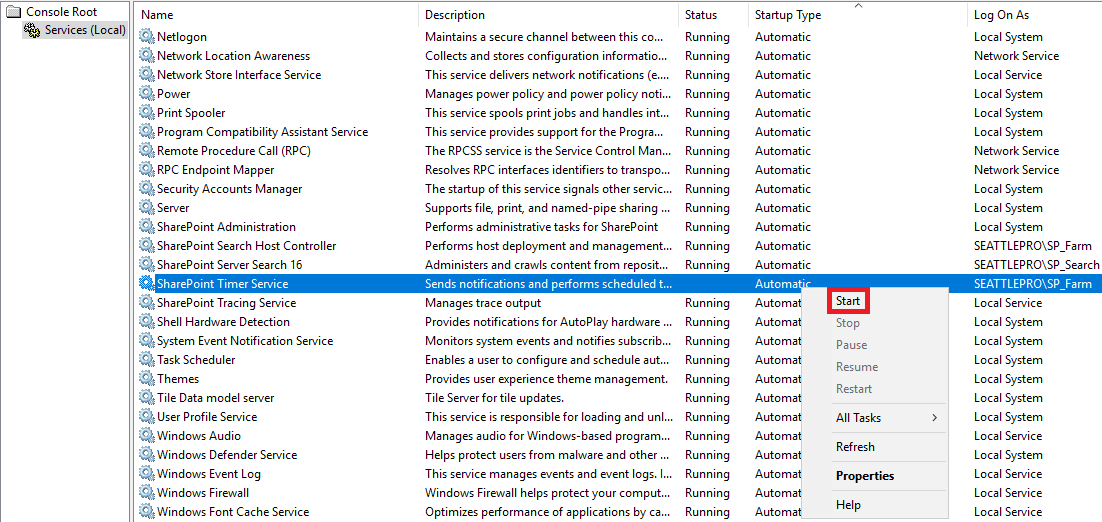
- Start the SharePoint Timer Service in the Services Console.
- You will notice that the cache files start to populate the folder. In my case it only took a few seconds but depending on your environment and configuration it may take longer.
- Verify that the value in the cache.ini file is no longer 1. It is likely to be a different 5-6 digit number than it was before.
- Copy this new cache.ini file to something like cache.OLD.ini and rename the original backup (cache – Copy.ini) to cache.NEW.ini. You don’t really need this old file anymore but I like to keep it for a while in an unlikely event that I have some issues with the SharePoint config cache.

- You have successfully cleared your SharePoint config cache at this point.
Using PowerShell to Clear the Configuration Cache
The following PowerShell script is provided by Microsoft. The scripts performs the following tasks:
- Loads the SharePoint add-in into PowerShell.
- Stops the SharePoint Timer Service.
- Deletes the cache (xml) files.
- Resets the cache by setting the value in the cache.ini file to 1.
- Starts the SharePoint Timer Service.
# Add Snapin
# Start Loading SharePoint Snap-in$snapin = (Get-PSSnapin -name Microsoft.SharePoint.PowerShell -EA SilentlyContinue)IF ($snapin -ne $null){write-host -f Green “SharePoint Snap-in is loaded… No Action taken”}ELSE {write-host -f Yellow “SharePoint Snap-in not found… Loading now”Add-PSSnapin Microsoft.SharePoint.PowerShellwrite-host -f Green “SharePoint Snap-in is now loaded”}# END Loading SharePoint Snapin
##################
Stop-Service SPTimerV4
$folders = Get-ChildItem C:\ProgramData\Microsoft\SharePoint\Config
foreach ($folder in $folders)
{
$items = Get-ChildItem $folder.FullName -Recurse
foreach ($item in $items)
{
if ($item.Name.ToLower() -eq “cache.ini”)
{
$cachefolder = $folder.FullName
}}
}
$cacheIn = Get-ChildItem $cachefolder -Recurse
foreach ($cachefolderitem in $cacheIn)
{
if ($cachefolderitem -like “*.xml”)
{
$cachefolderitem.Delete()
}}
$a = Get-Content $cachefolder\cache.ini
$a = 1
Set-Content $a -Path $cachefolder\cache.iniread-host “press ENTER”
start-Service SPTimerV4
You can download this PowerShell script here.
Copyright © 2016 SeattlePro Enterprises, LLC. All rights reserved.


Hello Zubair, I have a client who is experiencing this problem, even after performing the steps that you described, after a few days the problem happens again. Would you know the root of the problem? Why does this happen again so fast?
I thank the attention.
Hi Marcelo, it may have something to do with your configuration, but without looking at your environment it’s hard to say why your timer job is getting stuck. As a workaround you could run the PowerShell script to clear the cache on a schedule until you can figure out the root cause.